Table of Contents
Creating a photo book is an amazing way to share your memories with others, tell a story, and even showcase your photography skills. However, there are some important factors that you need to consider when creating a book like this, and there are some things that you need to make sure you do in order to create a successful project. In this article, we are going to talk about the transition from digital to print, and you can use this 2024 guide to learn some tips for creating a stunning photo book.
Start by choosing the right size
The first thing you need to do is choose the correct size. You need to start by doing this so that you can have a concept and you can easily translate your idea from digital to print without going forwards and backward all the time. You would need to consider the purpose of the creation as well as the audience you’re creating it for.
If you are creating the book for yourself, your family, or your friends, then you can go with something small a smaller including 8 by 8 inches or 10 by 10 inches. In case you want to create something professional and you want to be able to showcase your skills, then you may want to go with something larger including 11 by 14 inches or even 12 by 12 inches. Depending on your idea and what you want to create, it is going to be easier for you if you start by choosing the right size and then focusing on everything else.
Select high-quality photographs
Once you have decided on the size, the next thing you would need to do is choose high-quality photographs and choose and choosing something that is going to look good in the book. It is going to be extremely tempting to include every single photograph that you have ever taken. However, it is really important to be selective and choose only the best photos. Look for images that are well-lit, that are sharp, and that ultimately tell a story.
You should always try to include a variety of different photographs including white shots, candid moments, and close-ups. As you can see if you check this, a professional service can help you not only create and design the photo book but also capture and select the right images for it.
Make sure you organize your photographs

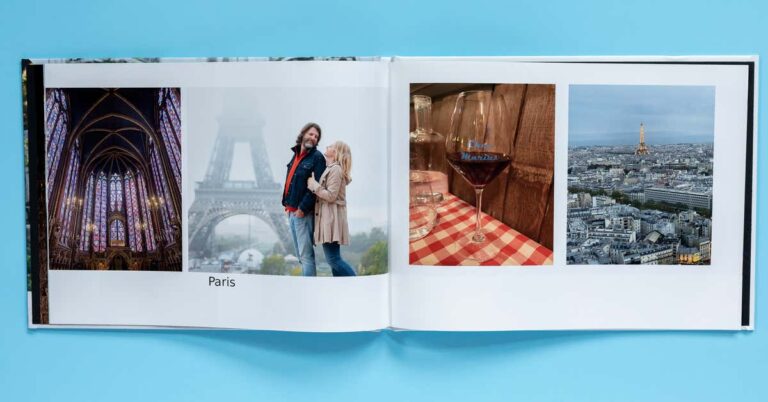
Now the fun part begins. Once you have selected the images that you want to include in your book, it is important to organize them in a logical order. You have a lot of creative freedom when it comes to this and you can organize them by the timeline or events or you can even select them and put them based on the theme of the photo book. Make sure that you create an outline or a story that is going to help you organize and put everything in the correct order.
Some people think that it is best if they put their images in chronological order, however, that does not always have to be the case. Depending on the overall theme and what you want to create with your photo book, you don’t always have to put everything in chronological order. Play around with ideas, and remember that this is the part where you’re going to have so much fun, so just because something looks illogical to others does not mean that it’s going to be illogical when you have the full design done.
Edit and adjust the images
You should know that before adding the images to your book, you have to add them to ensure that they are going to look their best when you print them out. This means that you would need to adjust the contrast, export, as well as saturation. In some cases, you may need to crop the images to create a better composition. One thing that you always have to pay attention to is not over-editing them, because you don’t want them to look fake and artificial.
If you don’t have the needed skills or time to do the editing, you can always reach out to a professional service that is going to ensure the photos look their best before you print them out and put them in your book.
Create a good theme
Once your images are all done, edited, and look perfect, you would need to choose a theme. You can get inspired by anything and everything around you, and you can choose the theme depending on the theme of the book, the audience, and what is going to look best depending on the photographs that you have chosen.
You can look for inspiration online, all around you, or you can just go to your local library and see how other photo books look. This is going to help you get an idea for the design, and you can play around with different color schemes, designs, huge, and even patterns and shapes. Remember that once again, you have all the creative liberty here, and you are free to do as many trial-and-error tests as you want until you find something that you are completely happy with.
Add text and proofread it
Finally, you would need to add text, if that is what you’re going for. Some people want to add some text, quotes, or anything similar to their images so that they can tell the story better. If you want to add text, you would need to take some time to figure out what is going to be best for your current project. Don’t forget that you would need to proofread everything that you have written to make sure that there are no spelling or grammar errors. The worst thing that could happen is to go through the book once it is all printed out and see that you have made a spelling mistake. Have someone else proofread it for you as well so that you don’t skip any errors.
Don’t forget to pay attention to the margins, bleeds, and the type of paper you are going to use, and always play around with your options until you find the best one for you. You should always order a test copy so you can see how the whole thing looks before it is officially printed. Remember that you are free to make as many or as few changes throughout this whole process, so even if don’t like something, you are free to change it.